Parallel and IPhone testing
GG, 20 October 2018
1. How to become IOs developer?
I remember how much I was exited when I ran my first test on mobile device - that was thrilling.
Empowered with a new motivation I didn’t want to stop and wait for another day shift. But later on it wasn’t so beautifull any more.
To run my test on IPhone I hit the wall and I could not wake up for a days. The name of this wall was APPLE DEVELOPEMENT TEAM.
First of all we need to install libimobiledevice by typing brew install libimobiledevice and ios-deploy npm install -g ios-deploy.
And this is where easy part ends up quickly. IMHO tutorial on appium.io is not very easy digestable. I will try to explain what needs to be done in easier to understand way.
As I mentioned before it is mandatory to configure XCode correctly to ran your tests on IOs devices. To do that, you need to be a member of APPLE DEVELOPEMENT TEAM. This is the
way how apple controles the software which goes to their IOs (Android is open source that is why we could start developing in android straight ahead).
When you go https://developer.apple.com/support/account/ you will quickly find out that registration is paid unless your employer has got the registered team already.
To sign in I had to speak with other team within my company which are in charge for mobile apps. Their Tech-Lead knew what to do and this is the way I recommend you to handle this limitation
if you work in a company of course. If you are self-employed then you will have propobly to pay a registration fee. Either way as a result of the regitration you should get iOS development certificate
and then add it to your keychain. Once cert is added then it will be reachable by XCode. Phew…
Let’s get to XCode. You need to open WebDriverAgent located in /usr/local/lib/node_modules/appium/node_modules/appium-xcuitest-driver/WebDriverAgent/WebDriverAgent.xcodeproj.
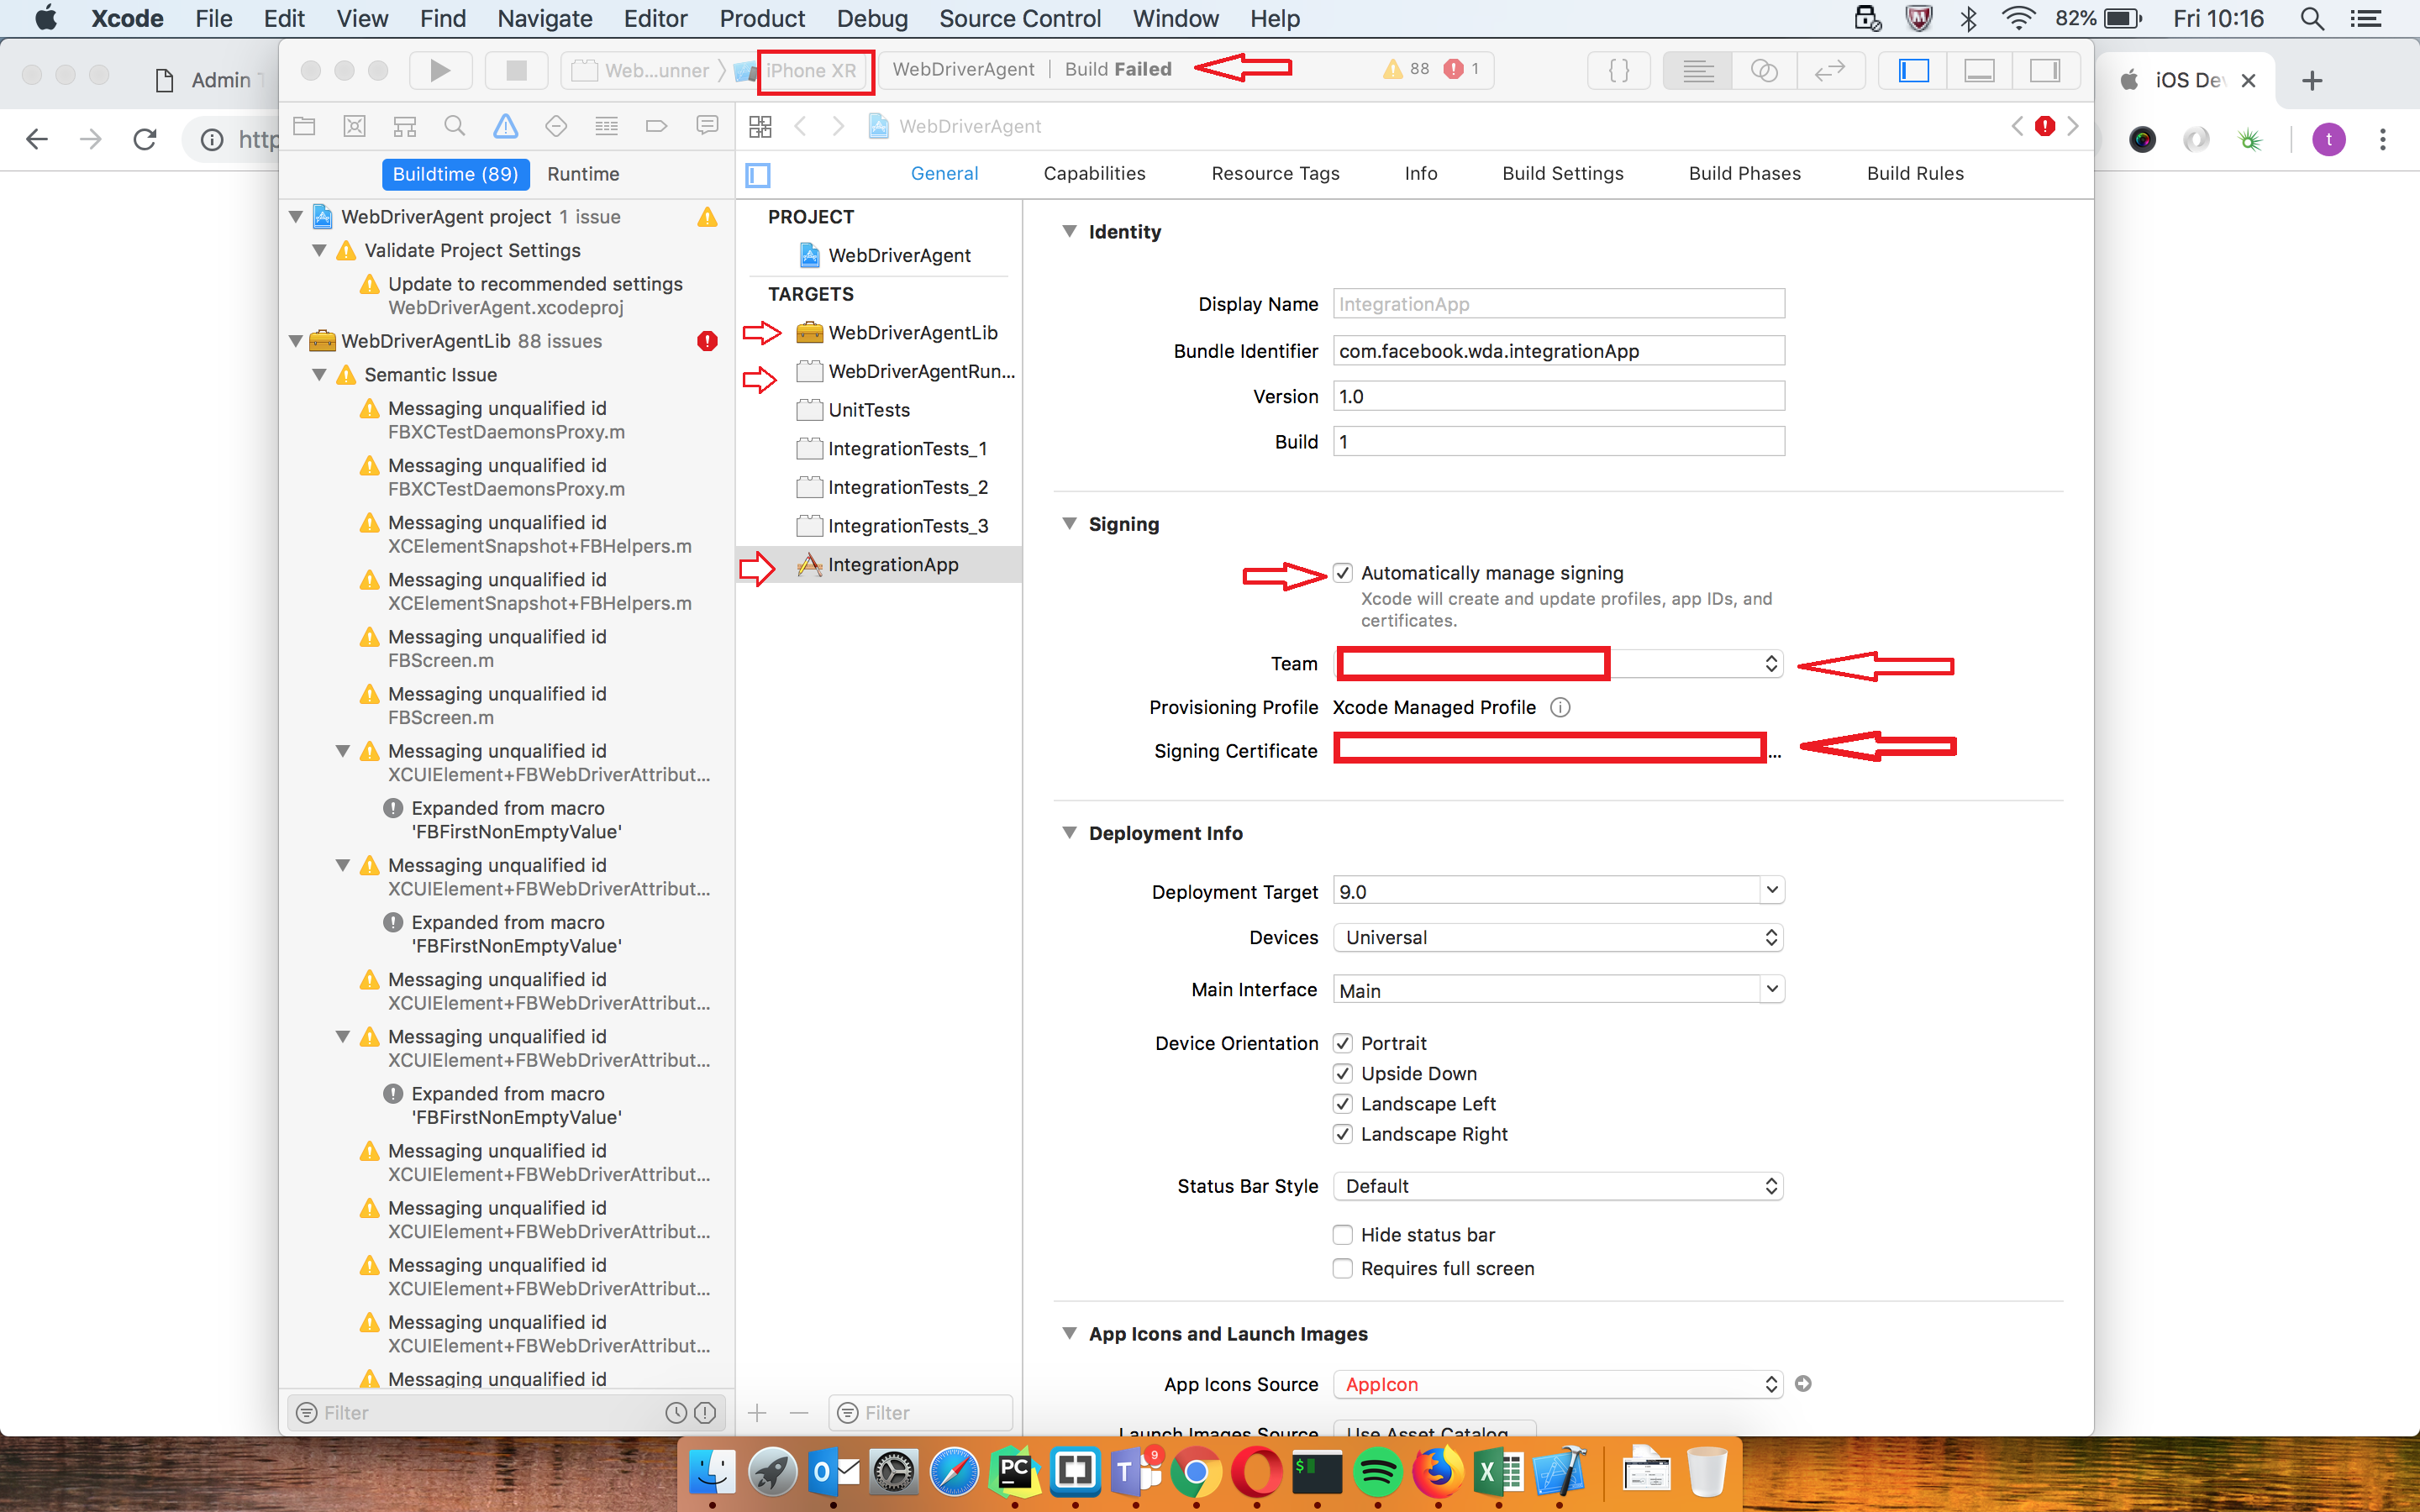
Then in XCode please select WebDriverAgentLib. As first please select your mobile on the top. The name should be the same as you can find it in options on your mobile. Then in Signing section you need to tick Automatically manage signing. In Signing(Debug) select your TEAM and certificate. The same in Signing(Release). Now repeat this steps in WebDriverAgentRunner. Great, now let’s build up this project in XCode. IF XCode is able to build it automatically without any errors it means that everything is working. All works? That means your WebDriverAgent has been configured succesfullly. Yupie!
2. Tell Appium about your IPhone.
So what now? Now we need to do what we have done in previous chapter. To manage mobile in appium we need to pass apropriate capabilities to webdriver. Again we need to find out UDID of our mobile. The easiest way to find it out is to open SETTING on your phone and go ABOUT and scroll to Serial Number - this is your UDID. Now let’s talk for a moment about capabilities.
        "iphone": {
            'platformName': 'iOS',
            'platformVersion': '12.0',
            'deviceName': 'iPhone 8',
            'clearSystemFiles': True,
            'automationName': 'XCUITest',
            "autoWebview": True,
            "app": "",
            'browserName': 'Safari',
            "udid": "02d1d609384136060123cf2bbfa46faf72d2ccc1",
            "showXcodeLog": True
        }
Potential users will propobly ue iOS 12.0 so I suggest to stick to this version for test purposes. Device name is the same what you can find on your mobile in your options section. Then it is very good practice to clean sesion files after the test to avoid memory leak. Automation name needs to be XCUITest for iOS devices. This will set WebDriverAgent as a mobile driver automatically. In tutorial at appium.io they saying about app file location which will point to the config file with your development certificate. TBH I failed to configure this field correctly. However if you configre your WebDriverAgent correctly then you can leave it as empty string but nevertless it still needs to be in CAPS otherwise test will fail. Browser needs to be Safari. That is apple policy for now that they support only ther own browser for now. As a last cap I et XCode logs as true to have a better view in what went wrong during running tests. Now the only thing is to pass this caps to webdriver and fingers crossed we we’ll see our test running on IPhone. Just make sure you create a appium driver with the same port what you set up in your appium instance.
3. Driver selector.
Assuming your tests went well on IPhone we should be half way there. Now we can run our tests on bot - iOS and Android devices. Our case coverage is increasing now. How about the usability of those tests? Well to do not mix up too much with the code everytime we need to run our test on certain device we should introduce some driver selector mechanim to our tests. To make our test base more maintainable I suggest to keeep CAPS and call for driver in seperate dict file. That will make our code more redeable and easier to edit in future. After some time of thinking how to parametrise selection of device for test I found that Python language does not offer any elegant solution for this problem. I decided then to keep the appium driver calls as strings and then use eval command to evaluate string line. That allowed me to pass the test parameter to the test and then select a mobile easy enough. To have a better covarage I added also some desktop webdrivers. Using behave I have done this like this:
from selenium import webdriver as desktop_driver
from appium import webdriver as mobile_driver

def before_all(context):
    context.device = context.config.userdata.get("device", "mobile")
    context.platform = context.config.userdata.get("platform", "iphone")
	context.driver = eval(Platform.ENV.get(context.device).get(context.platform))
    if "android" in context.platform:
        context.driver.switch_to.context('CHROMIUM')
    elif context.platform == "iphone":
        context.driver.switch_to.context
    else:
        context.driver.maximize_window()
I set two test parameters - device which can be mobile or desktop and then platform - which basically tells which desktop browser or mobile should be used. Moving on - I evaluate the string located in Platform.ENV (see below) to get the required webdriver call. Next depends what kind of device we are using we switch to webview in appropriate way. Please remember that selenium command maximize_window() will throw error when called on mobile browser because is not supported. Let’s see the dictionary now:
    ENV = {
        "mobile": {
            "XIAOMI": "mobile_driver.Remote('http://localhost:{port}/wd/hub', {caps})",
            "SAMSUNG": "mobile_driver.Remote('http://localhost:{port}/wd/hub', {caps})",
            "LG": "mobile_driver.Remote('http://localhost:{port}/wd/hub', {caps})",
            "IPHONE": "mobile_driver.Remote('http://localhost:{port}/wd/hub', {caps})"
        },
        "desktop": {
            "safari": "desktop_driver.Safari()",
            "chrome": "desktop_driver.Chrome()",
            "firefox": "desktop_driver.Firefox()",
            "ie": "desktop_driver.Ie()"
        }
    }
As you can see as first we select if we are running tests on mobile device or desktop then we select a required environment.
So In general all we need to do is to open 4 seperate terminal windows and create 4 Appium instances:
appium -p 4720 --chromedriver-port 9510

appium -p 4725 --chromedriver-port 9515

appium -p 4726 --chromedriver-port 9516

appium -p 4727 --chromedriver-port 9517
It is quiet important to distinct also chromedriver by port because you need to remember that this library is going to be called 4 times in the same time.
4. Reporting
Now to get the best results from your tests you might want to get some nice looking reports like this one here
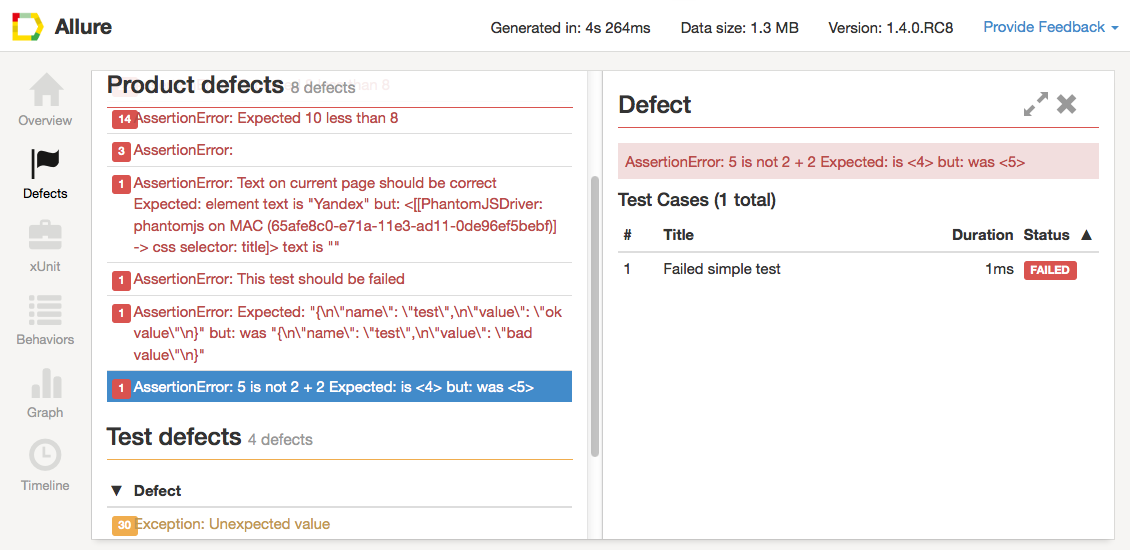 you might want to install allure reporting plugin which will accumulate your test results and present it in nice graphical view. All additional information can be found here.
If you are going to find this plugin usefull simply run
you might want to install allure reporting plugin which will accumulate your test results and present it in nice graphical view. All additional information can be found here.
If you are going to find this plugin usefull simply run pip install allure-pytest in your command line.
Let’s get to running your tests.
All what needs to be done now is to go to create appropriate appium instance and your project directory run in your command line: behave -D device=
Peronally I prefered to have previously prepared complete command which will run 4 tests at once and then create 4 reports of my tests. This is how I used to do it:
python3 -m behave -D device=mobile -D platform=iphone -f allure_behave.formatter:AllureFormatter -o %Iphone_test_report% Test/features & python3 -m behave -D device=mobile -D platform=android5 -f allure_behave.formatter:AllureFormatter -o %Android5_test_report% Test/features & python3 -m behave -D device=mobile -D platform=android7 -f allure_behave.formatter:AllureFormatter -o %Android7_test_report% Test/features & python3 -m behave -D device=mobile -D platform=android6 -f allure_behave.formatter:AllureFormatter -o %Android6_test_report% Test/features; allure serve %Iphone_test_report% -p 1114 & allure serve %Android5_test_report% -p 1111 & allure serve %Android6_test_report% -p 1112 & allure serve %Android7_test_report% -p 1113
Just to brief explenation: allure report creates HTML server so every report needs to be distinct by port and also to run 4 tests plus 4 report paralelly tests needs to be devided by ‘&’ and to make sure reports will be created when all tests are done then ‘;’ needs to be added before report creating commands.
And basically that’s it. If you struggle with the implementation you can visit my GitHub! profile.